Horizon view uses a virtual machine template as the basis of the pool whatever it is linked pool or instance pool. With an automated desktop pool that contains full virtual machines, you create a virtual machine template and Horizon 7 uses that template to create virtual machines in vCenter Server for each desktop. I will spend more on this post than others and we will go through all the parameters and configuration that are required because as much you improve the efficiency of virtual machine template, it will aim to reduce troubleshooting and improve the efficiency of the desktop pool.
Each desktop pool or RDSH server farm uses a virtual machine template as the model for the deployed virtual desktops. You use the VMware vSphere® Web Client to create the master VM. We will use Windows 10 LTSC as an ISO image. Windows 10 LTSC release does not contain Microsoft Edge, Microsoft Store, such as Camera, Cortana, OneNote, and other modern apps which designed for the situation where the key requirement is functionality and features don’t change over time.
1- Create a Virtual Machine
let us start with creating a new virtual machine with the following virtual hardware settings and install Windows 10 on it.
- CPU: 4 Cores
- Memory: 4GB
- Hard Disk: 30 GB
- SCSCI Controller 1: LSI Logic SAS
- Network Card Type: VMXNET3
2- Install VMware tools on the virtual machine.
3- Install the latest Windows 10 updates.
4- Use the Native Image Generator
Use the Native Image Generator command-line tool to improve the performance of managed applications. Open the command prompt as administrator and type following command and then press Tab and then press Enter.
cd Windows\Microsoft.NET\Framework\v4
Then type this command to execute queued compilation jobs.
ngen executequeueditems
For code execution on the .NET platform, the Common Intermediate Language (CIL) representation needs to be translated into machine code. If this happens immediately before execution this is referred to as JIT (Just In Time) compilation. The output of JIT is not persisted so your managed application has to go through JIT for every launch.
Alternatively, you can use pre-compilation to reduce startup overheads related to JIT compilation. NGen performs pre-compilation and keeps the native images in a native image cache. Then applications can run with the native images and may experience faster startup time due to reduced JIT compilation overhead.
5- Remove previous versions of updated components
Open the command prompt as administrator and type following command and then press Tab and then press Enter.
cd Windows\Microsoft.NET\Framework\v4
Then type the following command.
dism /online /cleanup-image /startcomponentcleanup /resetbase
Using the /ResetBase switch with he /StartComponentCleanup parameter of DISM.exe on a running version of Windows 10 removes all superseded versions of every component in the component store.
6- Run sysprep to create a generic image
c:\windows\system32\sysprep\sysprep.exe /oobe /generalize /mode:vm /reboot
7- Create a mandatory user profile
With mandatory user profiles, changes a user might make to the desktop are not saved when the user logs off. Ultimately, You can use App Volumes as a delivery mechanism that provides persistence profiles.
In the File Explorer, right-click This PC, and select Properties and then click Advanced system settings. In the User Profiles section, click Settings and while the default profile is selected, click Copy To.
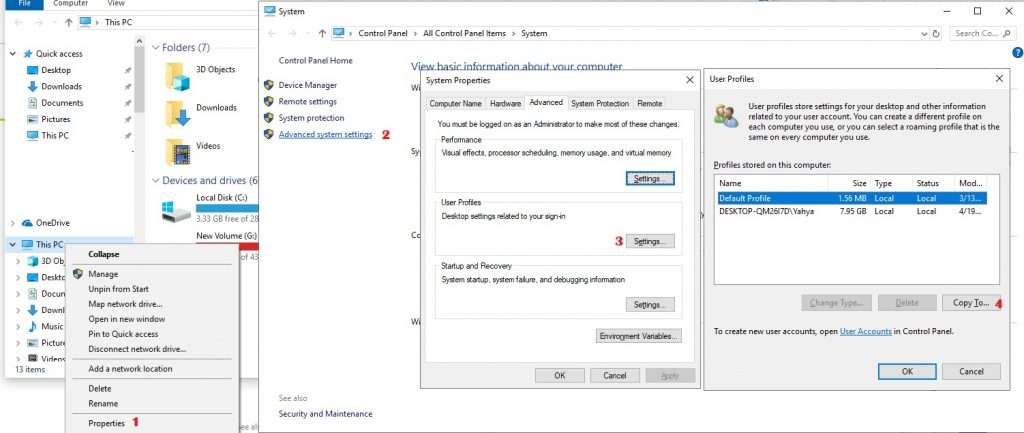
For Windows 10 LTSC (1809), type c:\users\mandatory.v6 and for other versions windows please refer to this link.
Click Change and type authenticated users and click OK. Note that the Mandatory profile is not selected.

If you see any other profile that is not Administrator or Default Profile, delete it.
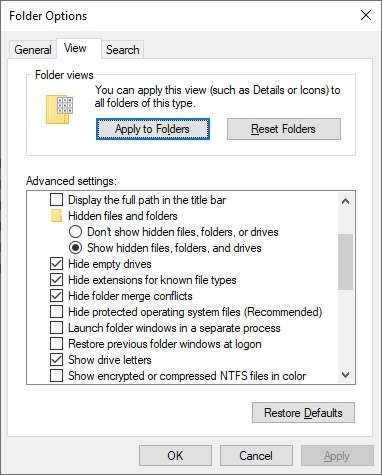
In the File Explorer window, browse to c:\users\mandatory.v6. This is the location where you just copied the default user profile. Click View and click Options and then de-select Hide protected operating system files and select show hidden files.
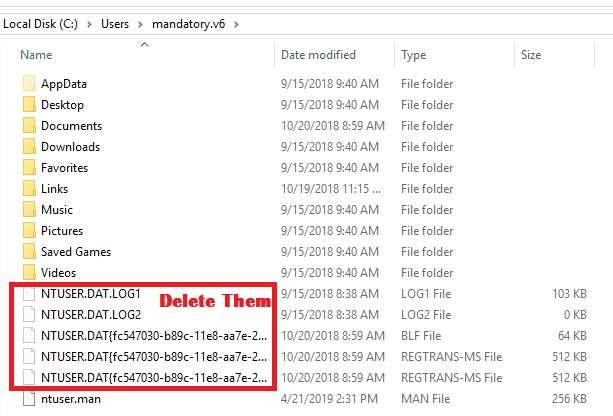
Rename ntuser.dat to ntuser.man. Renaming the file with the .man extension causes the user profile to become a mandatory, read-only profile. Select all files that start with NTUSER.DAT and delete them.
Finally, navigate to the AppData subfolder and select the Local and LocalLow folders and delete them.
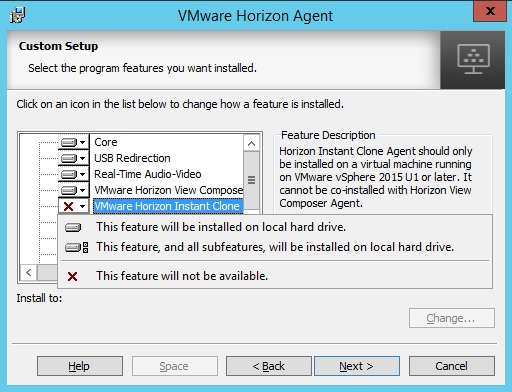
8- Install Horizon Agent
- Double-click the installer file to start the wizard, and click Next on the Welcome page.
- Accept the license agreement, and click Next.
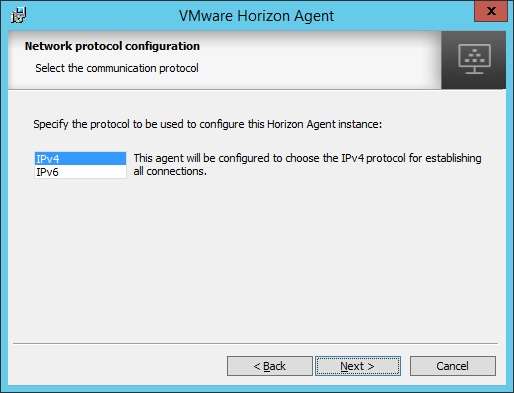
- Select the protocol whether to Use IPv4 or IPv6 and click Next.
- Enable the USB Redirection feature, and click Next.
- Based on your desktop pool whether it is linked clone or instance clone you have two options:
Instance Clone: install the VMware Horizon Instant Clone Agent, disable the VMware Horizon View Composer Agent, and click Next.
Linked Clone: install the VMware Horizon View Composer Agent, disable
- Instant Clone Agent, and click Next.
- Disable the Persona Management Feature.
- Enable installation of the Horizon Performance Tracker, as well as any other features you might require, and click Next.
VMware Horizon Performance Tracker is a utility that runs in a remote desktop or RDSH server and monitors the performance of the display protocol and system resource usage.
If the Remote Desktop Protocol page appears, select Enable the Remote Desktop capability on this computer, and click Next.
Now that all the correct components are configured to be installed, click Install.
Click Finish When Installation Is Complete.
When prompted to restart, click Yes.
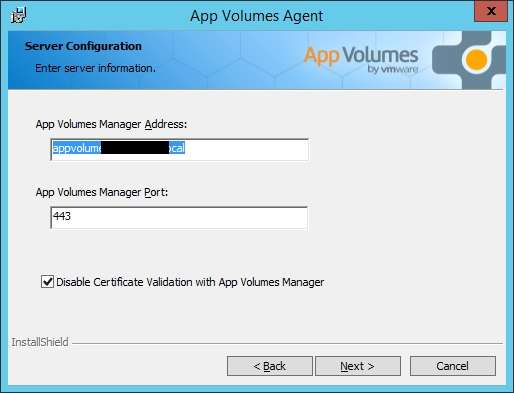
9- Install the App Volumes Agent
Installing the App Volumes Agent is an optional step. but we will install this agent because we want to deliver a persistent desktop session to the users each time they log in to a desktop. Also provide user-writable volumes, which allow users to install their own applications and have those applications follow the user as they connect to different virtual desktops.
You install the App Volumes Agent on the virtual machine template so that the App Volumes Manager can communicate with the desktops you deploy and attach the correct applications when a user logs in. we will discuss how to install and configure the App Volume Manager in another post.
- Double-click App Volumes Agent Setup file, and click Next.
- Accept the License Agreement, and click Next.
- On the App Volumes Install Screen page, select Install App Volumes Agent and click Install.
- Enter the hostname or IP address of App Volumes Manager.
- Enter port number (default: 443).
- Ensure that Disable Certificate Validation with App Volumes Manager is not selected.
- Click Next.
- On the Ready to Install the Program page, click Install.
- Click Finish when the installation is complete
- When prompted to restart, click Yes.
10- Install Applications in the Base Image
Although our primary application-delivery mechanism is App Volumes, it might be desirable to install select applications in the master VM so that all clones get those applications like Microsoft office or Pdf reader.
11- Optimize Windows Template
The VMware OS Optimization Tool fling helps optimize Windows systems for use with Horizon 7.
- Go to the VMware OS Optimization Tool page to download and start it.
- Select the Analyze tab.
- Select Templates and click Analyze.
- Click Optimize.
12- Take a VM Snapshot
To create a desktop pool of instant-clone pools and server farms, and for linked-clone pools, you need to take a VM snapshot of the master VM.
For full-clone pools, you achieve this state by cloning the master VM to a VM template.
13-Set a Policy to Use the Mandatory Profile
Now that you have created a mandatory user profile, you must create a policy to ensure that end users use that mandatory profile. To configure the path to the mandatory user profile, you use an Active Directory group policy.
Using a local group policy is not recommended because the local policy also applies to the local administrator account.
- Open the Group Policy Management Editor for the OU, and navigate to Computer Configuration > Policies > Administrative Templates > System > User Profiles.
- Double-click Set roaming profile path for all users logging onto this computer.
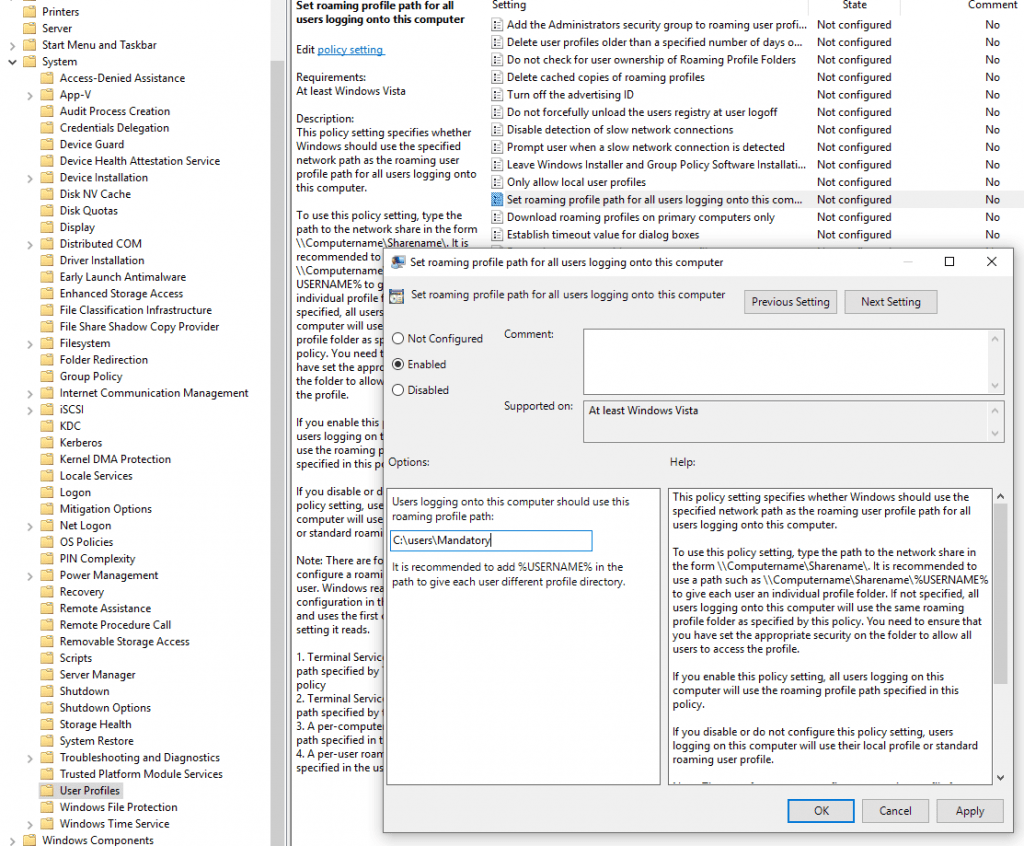
The path to the mandatory user profile does not have the .v6