This is part of the VMware vSAN guide post series. You can access and explore more objectives from the VMware vSAN study guide using the following link.
In my earlier post, I covered various vSAN security features. You can find the post here. Now, I’d like to illustrate how to activate security features and adjust parameters within a vSAN cluster.
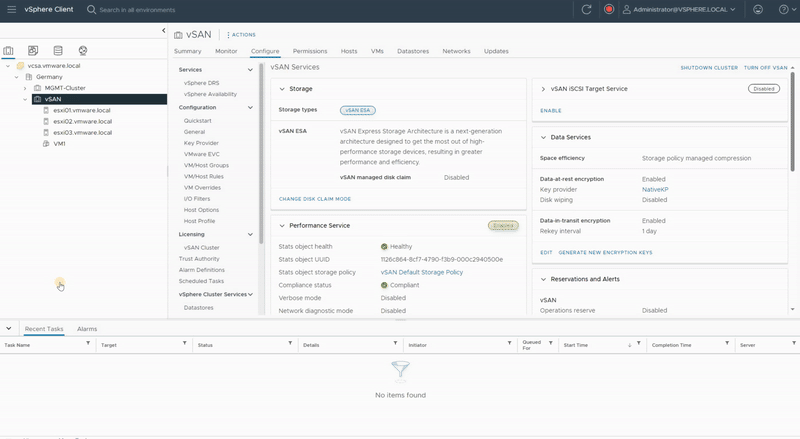
Data-At-Rest encryption
If you are using vSAN ESA, as I do, Data-At-Rest encryption must be enabled at the time of cluster creation. once it is enabled, it cannot be disabled. I enabled it at the time of cluster buidling up using NativeKP, if you remember from previous post, I mentioned that Data-At-Rest encryption needs key management, either External Key Provider or Native Key Provider. In this series I am utilizing Native Key Provider (NKP).
Configure a Native Key Provider
VMware offers a Native Key Provider since vSphere 7.0 U2, so let us see how to activate this service.
- Log in to the vCenter Server and select the vCenter Server instance.
- Click Configure, and under Security click Key Providers.
- Click Add then click Add Native Key Provider.
- Enter a unique name for the vSphere Native Key Provider across all vCenter Server systems, I have only one vCenter Server, so it should be unique within this vCenter Server.
- If you want this vSphere Native Key Provider to be used only by hosts with a TPM 2.0, select the “Use key provider only with the TPM protected ESXi hosts” check box. I mentioned what are the benefits of using Key Provider with TPM, but If your host doesn’t support TPM 2.0, you can ignore it. Click Add Key Provider. (I selected this one solely to demonstrate the complete procedure. As I’m utilizing nested Lab and TPM 2.0 isn’t supported in my host, I ignore it.)
- Select the newly created Key Provider and you will notice the status is “Not backed up“.
- Click Back Up to start the procedure, I strongly recommend selecting the “Protect Native Key Provider data with password” check box and providing a suitable password to protect the backup.
- Save the password in a secure location and check I have saved the password in a secure place box.
- Click Back Up Key Provider and the browser automatically downloads the backup file in PKCS#12 (P12) format.
- The status of the NKP changes from Not Backed Up to Active, which means that the information has been pushed to all the hosts and NKP is ready!
Change Key Provider
Consider the scenario where either your backup key or encryption keys have been compromised, and you’re planning to change the NKP (Native Key Provider) for the entire vSAN cluster. How should we proceed? I have generated a new NKP, so let’s proceed to update the vSAN cluster with the new NKP.
- Navigate to the vSAN cluster.
- Click the Configure tab.
- Under vSAN, select Services and click the Data-In-Transit Encryption Edit.
- In the Key Provider settings, select the new Key Provider from the drop-down menu and click Apply.
- This will push new information to every host in the vSAN cluster and the vSAN cluster will be updated with the new Key Provider.
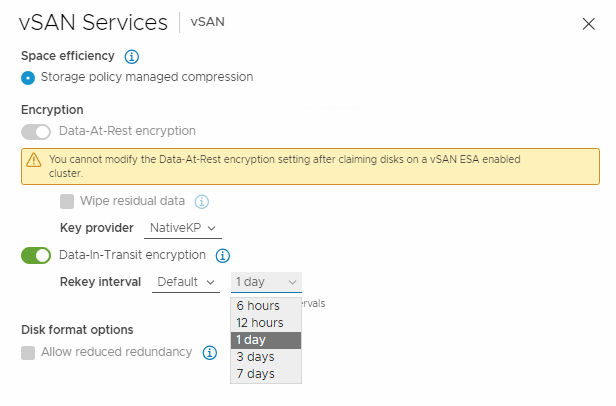
Data-In-Transit encryption
Data-in-Transit encryption encrypts all vSAN traffic in transit across hosts. it uses symmetric keys that are generated dynamically and shared between hosts. Hosts dynamically generate an encryption key when they establish a connection, and they use the key to encrypt all traffic between the hosts.
- To enable or disable this feature, navigate to an existing cluster.
- Click the Configure tab.
- Under vSAN, select Services and click the Data-In-Transit Encryption Edit button.
- Click to enable Data-In-Transit encryption, and select a rekey interval.
- Click Apply.

Deep and Shallow Rekey Procedure
You can generate new encryption keys including KEK and DEK for Data-At-Rest encryption in case a key expires or becomes compromised. When you want to generate only KEK, it is called Shallow Rekey. However, when you want to change both KEK and DEK, it is called Deep Rekey.
During a Shallow Rekey, a new KEK is generated, and all hosts in the vSAN cluster receive the new KEK from the Key Provider. The hosts’ DEKs are then re-encrypted with the new KEK. During a Deep Rekey, a new KEK and DEKs are generated, and all data is re-encrypted using the new keys. Let’s perform a Shallow Rekey or genererate a new KEK:
- Navigate to the vSAN cluster.
- Click the Configure tab.
- Under vSAN, select Services and click the “Generate New Encryption Keys“ button.
- Click “Generate” to do a Shallow Rekey.
- Select the first check box to perform a Deep Rekey. (It is not supported in vSAN 8 U1)
- As you see in “Recent Tasks” section, vCenter generates a new KEK and pushes it to all hosts in the vSAN cluster.
A Deep Rekey operation for vSAN ESA is only available in vSAN 8 U2 and newer, Since this test lab is running vSAN 8 U1, I plan to upgrde this environment. Once the upgrade is complete, I will return to update this post accordingly.
I hope this is informative for you.
References
https://core.vmware.com/resource/vsan-encryption-services
https://core.vmware.com/blog/cluster-level-encryption-vsan-express-storage-architecture
https://core.vmware.com/resource/vsan-frequently-asked-questions-faq